
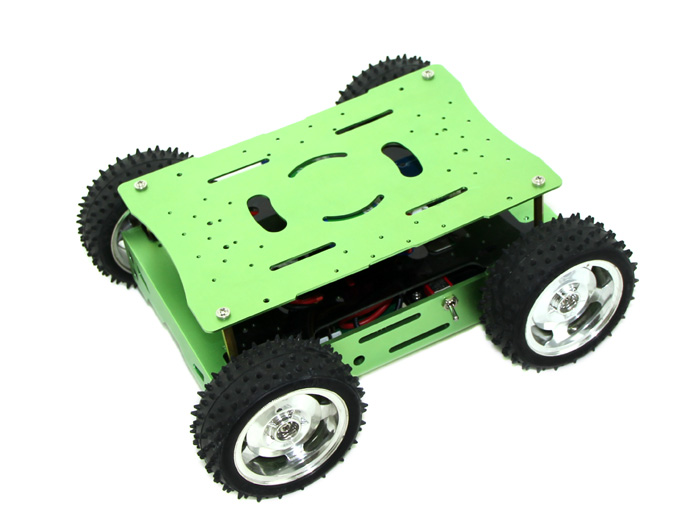
We purchased the Seeed Studios Skeleton Bot – 4WD Hercules Mobile Robotic Platform from robotshop.com. Robotshop’s price is the same but they ship from the US. This is initially for my son’s science project, but we figure we can do all kinds of robot projects on this platform.
The unit was shipped promptly and arrived slowly because we cheaped out on the shipping and it came from the other coast over the New Year holiday.
Our first impression at un-boxing is that this is an extremely well designed and thought out kit. Everything is packed neatly into the box with a minimum of filler, and the inventory count exactly matches the pictures at the Seeed Studios website.
The four main chassis rails are heavy gauge aluminum extrusions with a flawless green anodized finish, with steel corner brackets, all of which fit together perfectly. I suspect digital machining has been used. This makes for an extremely strong frame to protect the electronics from whatever impacts are ahead.
My son did all the assembly, and although he is only an experienced Lego constructor, not Meccano, he was able to complete most of the assembly unaided, with only the very scanty (and small) instruction diagrams. A particularly nice touch, which I think shows the thought that went into this, is that the spacers which support the motherboard locate into the holes in the lexan base plate. Without this little touch these would have been painful and annoying to line up.
Other design features of the chassis which impressed:
- The use of standard RC car wheel mountings, battery and charger. This will allow for easy component changes if desired e.g. bigger battery.
- Empty mid-deck platform with plenty of space to add more electronics protected inside the aluminum top plate.
- Lots of mounting holes pre-drilled and cut in the lexan mid-deck and top plate for adding more stuff.
- The motors are beefy, with 36:1 gear ratio.
- Everything fits compactly into the space, without cramping.
We have encountered some small issues:
- It is almost impossible to access the reset button on the controller card once it is mounted. In reality you probably want to mount an external reset button anyway, so this is not a big deal.
- The mounting clips for the battery are about as close together as they can be, but with the rounded ends of the 7.4V 2200mAH Li-PO battery, they tend to slip off.
- On our unit the cutouts in the side plates are reversed from the pictures and instructions (except for the color blowup on the wiki page) . This means it is impossible to mount the battery and on/off switch in the position listed in the instructions. After some head-scratching, we solved this and the battery securing problem by pushing the battery all the way against the frame rail and securiing with one clip only, and installing the switch in the bottom hole but rotated ninety degrees, where it wedges in and holds the bottom plate down.
- One of the motor encoders (these are rev counters not quadrature encoders i.e. no direction sense) is missing its Hall effect sensor. This appears to be a manufacturing error at wherever Seed get their motors, as there is no sign any component has ever been soldered in those holes. I’ve asked Robotshop what they can do to resolve this – I’ll be happy if they send me the 95c chip to solder in myself. See comments below for updates.
- The motors are all wired the same way (as you would expect) but when you use the supplied software library, the robot spins in circles. The reason for this is obvious – they are all going the same way, clockwise or anti-clockwise, when you tell them to all go “forward” or “back”. The fix for this is simple – carefully pop the contacts out of the motor plugs on one side and reverse the motor polarity. This is not mentioned in the instructions anywhere I can find.
- Also not mentioned in the instructions is how to plug the 3-pin “encoder” wires into the 4-pin encoder connections on the board. (black is ground, don’t worry about the extra pin on the board, that’s for quadrature encoders)
- Be aware that the kit does not come with a wall-charger – just a cable with alligator clips. You need a 12V battery or a 12V 800mA wall-wart (Radio Shack $20). As they sell this kit globally it makes economic sense for them to have skipped this. (update: a commenter below says that they now include this)
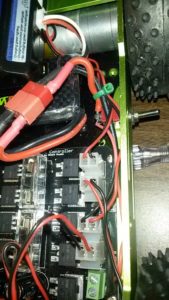
Once we got those little things sorted out we ran the test programs and Hercules sprinted across the floor. The test is at 80% duty, so top speed must be very fast.
I’m not going into the details of the Hercules 4WD Robot Controller card itself here – it deserves its own review – other than to say I am also impressed by the design and parts quality, and less impressed with the documentation. The card includes an Arduino compatible controller, voltage feed from RC type Li-Po batteries, two high power MOSFET H-bridges with fuses, and all the Arduino pins are available in a variety of standard pin formats (grove, FTDI, servo). It even lets you read the voltage on your Li-Po battery. In short – every thing you need for a self-contained Arduino robot platform. It is clearly designed to be used in more places than just in this robot kit.
In summary I am extremely impressed with the design and build quality of this robot. You get a heck of a lot for your money, and unlike most things that are described that way, this is high quality gear.



8 Responses
Update on the motor encoder. Robotshop responded quickly to my query on their support page and are shipping out replacement components with return shipping. Very good service.
RMA motor arrived today. Looks good.
Hi
I just purchased one of these as well with similar objectives.
Early days yet. I Agree with your assessment. This seems like a very useful first start.
Where did you get the information on the gear ratio, I have been searching every where for information on the motors. I wanted to ensure I could get replacements in the future but I had no luck.
Regards, Richard
The gear ratio was worked out empirically. Turn the motor by hand and count how many turns makes the output shaft go around.
Hi, great review. I purchased the same unit, could you post the code you used? trying use this unit tethered to joystick for visual inspection under a large block and I am not to savvy when it comes to c++. I cannot fine any code that uses a tethered joystick. Thanks for any guidance.
We did not use a tethered joystick. This was my son’s first robot science project and he’s done very little coding before. The interface he ended up with was a bunch of buttons for right30, straight50 etc on a web interface on his cell phone – talking via wifi to the RPI, which forwarded them to the Arduino. Crude, but he got it done in time for the fair.
My update – just purchased this. It was out of stock all October at seed and I really was hoping (expecting) some of the things here you mentioned would be fixed. Here are my notes to your notes:
– It now comes with a wall charger :) Plugged in and it balances and charges the battery very well (I tested voltage per cell and it was within 0.03 per cell over several dis/charges)
– The power switch I gave up on. I can’t imagine how you got it in. I gave up and just have it hanging on cables for now until I figure out what I want to do. This *really* sucks because everything seems so high quality – the chassis is crazy strong.
– They still haven’t fixed the motor direction. You either need to cut and swap cables, or mentally be prepared to run a motor in reverse to move it forward.
I did buy this because of the beefy motors (seems like separately they would be ~$120), ability to use standard RC tires, and the motor controller (which is now a huge problem for me).
I’d give it a 4/5 even though I can only use it while hooked up to usb right now.
Good grief! A comment! Somebody actual read my stuff! :-)
On ours the aluminum rails are mirror image from the doc – which puts the switch hole at the bottom, colliding with the battery. The fix was to only use the battery strap on the far side and push the battery all the way back.
For reversing the motor cables you don’t need to cut them, just pop the terminals out of the plastic connector block and swap them – you need to push in the little metal tangs on the side and then they slide out. This is a handy trick to learn as you can repurpose scrap cables from PCs, reverse drive on Dalek chassis, all kinds of useful stuff.
I’ll update the review with another picture that shows both of these.
The motor controller is not standalone – it is an Arduino and motor controller combo. Very powerful but the motor controller cannot be accessed directly. Most of the Arduino pins are used for motor control which makes it less useful as an Arduino.
My current setup I’m using another arduino for the “brain” to send speed and direction and distance commands, and the embedded controller is focussing on that, while the master deals with sensors and display and buttons and stuff.